About Me

My photo
Pune/ India -> Irvine/ CA -> Boulder/ CO -> Pasadena/CA
Welcome to my blog! I'm Hrishi from Pune, India. I am an earth system scientist currently working as a postdoctoral researcher at NASA Jet Propulsion Laboratory. These blogs are mostly about my travels, landscape photography, scientific computing, book and film reviews, fitness, cooking, and science communication. Feel free to navigate based on the labels below. My website: hrishikeshac.wix.com/hchandan

Labels

Sunday, April 19, 2020

Fast and loose watercolor sketching and painting

I have been asked several times recently how I go about with watercolors, so here’s a short writeup describing my workflow. 

[note: I am just a hobbyist. Please consider taking virtual lessons from a professional artist. Why? 
1. You will get much better guidance and instructions
2. Freelance artists are some of the worst hit professionals from COVID-19. If we care for art, it is our moral duty to support those who risk their livelihood on creating it
3. If the lessons are too expensive, you can still email the artist and ask- given the dire circumstances, chances are they might be flexible with the class fees.]
Painting Bear Creek Spires from Mosquito Flats, Eastern Sierras, March, 2020. 

Watercolor is my preferred choice of medium because I found it to be the fastest and most expressive way of depicting the inspiring scene before me. I often paint plein air in the backcountry. My focus is always on getting the painting done ASAP. There are endlessly methodical ways of going about watercolors: draw a thumbnail value sketch, then a pencil sketch, then apply a diluted wash then a second one and finally a third one etc. Not to mention the tricks one can do to create textures. All these fancy things may result in a great painting, but often compromise the spontaneity and freshness, and usually take far more time. My approach is to do the bare minimum to capture the essence of the lovely scene in front of me. 
    Direct watercolor is blazing fast. This live sketch of Pantalaimon took less than 5 minutes. If you look closely, you can see all individual brush strokes. This is what I mean when I say that direct watercolors are the most expressive medium when under a time crunch. The paper is NOT a 'watercolor' paper nor it is archival. It still works well, don't you think?

Here’s how I do it:

Materials
I use minimal materials. Minimalism in equipment serves two purpose: it saves time, and since you always use the same few things, you end up getting really good at using them! 

Here's a good peek into my plein air setup. My DIY palette, the colors, and direct watercolor  of Soyumbhu Temple in Kathmandu, October, 2019. 

  • Paper. I often draw several scenes back-to-back and can’t really wait for each of them to dry before starting the next one. This rules out sketchbooks. Carrying a sketchbook also means carrying the dead weight of all the previously done paintings. Instead I use quarter-sheets cut from loose sheets. It works out way cheaper this way, and you can get 2-3 times the area -that too of a more professional grade paper- for the cost of average sketchbook (which likely has sub-optimal paper). They are cheap, and I can add a variety of them. I prefer 140lb paper as it is light and yet sturdy enough for watercolors. A heavier 300lb paper intimidates me, so I almost never use it! I understand a lot of professional artists recommend getting the best paper affordable. That is certainly true, but I believe you can use anything optimally by using its strengths and minimizing its limitations. I’ve made quite a decent sketches using a cheap $5 sketchbook with 65lb paper. 
    Paper and brush don't matter that much. Made using a water brush and a 65 lb non watercolor paper. Since the brush lacks a fine point, I used pen/ink to add details and as a 'honey layer' (more described below). Bryce, November, 2018
  • Brush. I mostly use just one brush- a size #8 Princeton Neptune. This negates the dilemma on when to switch brushes etc. I also carry another brush which would only be wetted with clear water, and serve to soften the edges made by the #8 in a rapid sketching session. I've found that brush type doesn't matter as much as the quality of the paints. Naturally, if a brush doesn't make a fine point, you can't draw finer details. At that point you can replace it, or get a smaller one just for details, or just draw bigger drawings, or avoid painting pointed lines altogether and use a pen instead (ink and watercolors look beautiful!). Synthetics work well enough and are cheap and expendable. Size #8 Princeton Neptune cost me $7. 
    Recently, I switched to a two-brush setup of a larger quill and a #2 round. While they work great, I miss the simplicity of a do-it-all single brush. Hence have started reverting to #8 again. Another look at my chaotic palette. Squiggly Tree on El Prieto trail, February, 2020.   
  • Paints. I use only 8 paints: split primaries (warm and cool triads of red, yellow, and blue = 6), Burnt Sienna, and Neutral Tint. I mostly use burnt Sienna with Ultramarine blue to create various shades of grey. These along with a warm yellow form my mostly used triad- I recently discovered this actually has a name! Velasquez palette! Neutral Tint mutes colors while keeping their essence. if I could have only four colors, these would be it. The fifth would be a magenta (cool red). The sixth would be phthalo blue (cool blue). A cool yellow, and a warm red are nice to have just to give an infinite range of colors. I fall into the category that never wash palettes. This is to say that I don’t really think in terms of what exact color shade I am using. Fussing over colors unnecessarily complicate things in the backcountry. Instead, I just think of colors  in “-ish”. "Is it reddish enough? Greenish? Warmish-greenish? Bluebird sky blueish? Sierra granite greyish? Joshua tree granite-ish? " etc. this takes away a lot of pressure! I’ve only used Daniel Smith and don’t have a reason to complain against them. If you are on budget, between paper, brush, and paint I'd say invest in the best but limited number of paints, cheapo brush, and a few loose sheets of decent (140 lb) paper. Following are the colors I have:
Warm/orange red:    Pyrol Orange
PO73
Cool/violet red:    Quinacridone Rose
PV 19
Warm/orange yellow: New Gamboge
PY153
Cool/green  yellow: Hansa Yellow Medium
PY 97
Warm/green  blue:   French Ultramarine
PB 29
Cool/violet blue:   Phthalo Blue 
PB 15:3
Earth Color:        Burnt Sienna
PBr 7
Grey:               Neutral Tint
PBk 6, PV 19, PB 15
  • Palette. Since I don’t think in terms of exact colors, I like having a large area where I will make a puddle with varying colors. For example, if I want to mix grey, I will make a puddle of burnt sienna and next to it make a puddle of ultramarine blue. Then I’ll drag them mid-way to create a puddle of grey, but it won’t really be a homogenous mixture, but rather, a spectrum of greys starting from ultramarine blue and ending in burnt sienna. Every time I reach out for paint, I’ll dip into different places in the puddle- say warmish to represent lighter areas, or bluish to represent shadows. This gives infinite variations of greys and the resultant wash looks lively and intricate. It’s stupid simple, really. For backcountry plein air, I made my own palette which serves as a palette with giant mixing wells, as well as a support to hold the painting and water container. More on that later. But any palette or tray or a saucer is okay to begin with. A white-colored palette is preferable as it makes it easier to see the shades you've mixed. 
    When home, I use a bigger palette in order to not overuse my field palette. Thus, would like to iterate that it doesn't really matter which palette you use as long as they are white.

Process
Typically, paintings are done in multiple washes called as glazing. The first wash is the most dilute one and lightest color in the painting. Think of bright highlights in the painting. The next one would be darker and so on. Together, these generate a sense of depth, as the lightest layer shows through the upper layers. The key limitation of this process for me is having to wait for the washes to dry up. To fasten the process, artists often use hair driers. Obviously, that is not an option in the backcountry, and I feel weird to use such a high-tech tool to do something as simple as drying the paper! My preferred way of painting is a lot simpler. It all comes down to shapes, hard and soft edges, and values. A lot of it has been well described in 'Urban Sketcher' by Marc Taro Holmes. If I could recommend you only one book as a beginner nature watercolorist, this would be it. Yes, I know it is directed towards urban sketchers, but it succinctly describes the minimalist approach I use to painting nature. Another book that I really like -and this one is targeted towards nature watercolors- is Carl Purcell’sYour Artist's Brain: Use the right side of your brain to draw and paint what you see - not what you think you see’. It is a fantastic book, but it aligns quite well (is consistent) with the approaches and techniques that Marc Holmes describes in his book. Hence, if you could afford only one book, I’d still recommend the Holmes book. (I’ve read more than 20 books from the public libraries and own several of them, including the Gordon Mackenzie book that has virtually every trick one can do with watercolors. For fast and loose style, the Holmes and Purcell books would suffice). 
A simple breakdown of my process is as follows:
  • Start with watercolors directly! This is probably the number one reason my paintings look the way they do, and they get done so fast - almost always less than 30 minutes. I find pencil sketching/ pen lines predefine the scene for your brain. Your painting ends up being more of a ‘filling in’ the colors in a coloring book. When there is nothing on the paper, painting becomes a highly iterative process- each future step depends on the current step. This is highly conducive to expressing your emotions as well as making quick decision and follow your impulses. Or painting what ‘really’ excites  the 'inner' you. Think about it- you drop in a really thick paint and it will dry up in seconds so you have to keep painting. This somehow overrides your brain and you go in a trance almost immediately. Later, you’d be amazed how many things you ‘left out’ of the painting. Painting directly also provides an instantaneous feedback- you know more or less exactly how that part is going to look like in the finished painting. 
    Start painting directly with watercolors to get a 'certified fresh' look. Raspberry, March 2020. 
  • Think of the painting as an arrangement of 2-8 large shapes or objects. Each shape will be identified from the others by a hard edge. If the edge is not hard, then for our purpose, it can be a single object. A shape or object here is simply a connected mass of values that can be seamlessly blended. e.g. The foreground can be a single object though it’d have trees, rocks etc. Or a range of mountains can be a single object. Or the entire sky would be a single object. Inside of an object or a shape, there should NOT be hard edges. Only seamlessly blended medley of colors and values. Since I am painting directly, I usually restrict the painting to only 1-4 big objects. Mountain peaks or rock climbing routes work great. I obviously can’t plan for detailed landscapes without sketching first (and spending a lot of time), hence this forces me to select only a handful shapes that really speak to me. I call these ‘earth portraits’. These work especially well plein air, looking as up close (with a human vision that equates to about 45mm focal length's field of view on full frame SLR ) these objects can be seen obviously. Take a picture with a iphone (28mm full frame equivalent field of view) and they get lost! Even if there is a great expanse in front of me, I only choose a few objects. Then I simply start 'drawing' with a juicy loaded brush! 
    Though there are several rocks/ boulders here, they are treated as a single layer. Cracks are painted after the first layer has dried, as is some dry brushwork to create texture in the lower right. The rest of the painting is all one variegated wash. Apple Valley, November 2019
  • There are 5 major shapes: the sky, the reflected ground (including the pond, the marble, as well as the reflection of the monument), the shrubs, the monument, and the people. Washington Monument, Washington D.C., December 2018. All paintings in this article are direct watercolors. However, including one that started with a pencil sketch. While it's one of my popular painting, it has a structured, 'mainstream' look. 
  • The 'chai' wash: Do 90% of the painting in a single layer/ wash. In his book, Holmes refers doing a painting in three washes: a diluted first wash with a consistency of ‘tea’, then after it dries, a second wash with thicker paint with the consistency of ‘milk’, and finally a third one with thick dark paints/ values with a consistency of ‘honey’. In the interest of time, I combine the tea and milk washes together in a single first wash. It is already quite bright and saturated, and would be the first and final thing to touch most paper area. The drawback here is that if I miss a spot or two, the white paper would show through. I don’t mind this and I believe it gives it the ’sketch’ or spontaneous feel. Since it is a combination of tea and milk, I call it a ‘chai’ wash! This is how I go about the ‘chai’ wash:
    • I start with a big object, typically with its lightest tone. The moment of a loaded brush touching a new paper is magical. And infinitely satisfying. every time I reach for colors, I pick up a new shade, this creates intricate variegated patterns. Then as I turn to shadowy side of the object, I’ll pick a darker color or simply add Neutral Tint into the existing one.  The key is to continue growing the wash till it covers the entire object, without getting it dry. If it dries in the middle of an object, it will create a hard edge that will be difficult to hide. As you are ‘growing the wash’, keep adding darker tones/ values/ colors into the lighter ones to create texture or shadows. This is called ‘charging in’, or ‘tapping in’.
    • Once you are done with the first object/ shape, only then move to the next one and so on till all the shapes are done. 


      The 'chai' wash. It is as bright and saturated as this painting is going to be. The next wash will simply add a few details. Echo Cliffs, April, 2020

  • The 'honey' wash: To quote Taro Holmes, the honey wash is so thick and dark, and used sparingly it’s almost like doing calligraphy. The need for this second wash is governed only by the need for hard edges. The honey wash is given only if 1) I need hard edges over the paint: think of sharp shadows of one object falling over the other; 2) carving out a smaller shape from a bigger shape; and 3) adding texture on the surface of a shape, typically done using a dry brush technique. The honey wash, though used only on sparing surface, is extremely important as it gives the painting a ‘punchy’ feel. 
    Completed with 'honey' wash. Notice the edges, dark shadows in the middle and right rocks. While this finished version also has the sky, this would have technically been a 'chai' wash. I decided to add the sky and the vegetation at the last minute.
That is all there is to my paintings!

Some resources (specific to this style) to get started with
  1. Flat wash. https://www.youtube.com/watch?v=ycYL8DvYSGc. A good starting point to start watercolors is by learning a flat wash. Washes are valuable in understanding how much to load the brush with pigment, how much is too diluted. Err on the side of dilution. Note how in this video a syringe is used to add water to create the mixture. Next is to draw random objects and paint a wash inside of these. Then once the wash is dried, paint a uniform wash outside of the shapes. The video uses a couple of lotuses, but the shapes can be simple circles/ rectangles. 
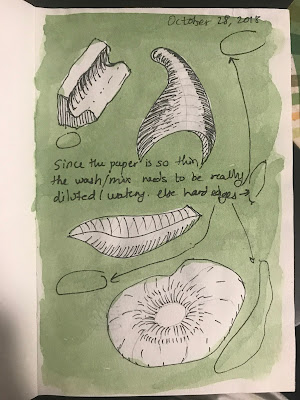
    Avoid hard edges at any cost. If you get them, that means the wash needs to be more diluted and you need to move quicker. I was testing the 65-lb paper sketchbook for its handling of watercolors. Doing a wash made me realize I'll have to use really thin washes and only a couple of them (along with 'charging in'). Once I realized it, I was free to use the sketchbook for daily watercolor practice!
  2. Graded wash: https://youtu.be/Q3tQ_lvuHZU
  3. Variegated wash. After learning a flat wash in positive (inside shapes) and negative (outside shapes) way, it might be useful to learn variegated washes. There are many ways to go about this, but I prefer simply pre-wetting the paper, and loading all colors simultaneously, then moving the paper around to letting them mix well. One of my favorite artist Joanne Thomas Boon demonstrates this to perfection here: https://youtu.be/q-_ltqi--5A
    I don't usually don't do 'clean' washes like these, but practicing variegated washes serve two purposes: doing them correctly means that you know how to do a flat wash and a graded wash, and you get to see how colors mix (point #5 below). Sometime in 2018. You might notice the tape here. Last year I stopped taping the paper. quarter sheets work well with simply attaching 4 magnets (8 in all) on the four sides. A lot more sustainable alternative to tape. 
  4. Values study. Once you get a hang of washes, learn see and paint values. It is the values and not the colors that make a painting interesting, so nailing them is the key. Look at breathtaking pictures of Ansel Adams and you'll know what I mean. It is also a lot easy for a beginner to work with a single color instead of learning how colors mix. So a Neutral Tint works great in this setting. Here's fantastic demonstration in direct watercolors: https://youtu.be/GTXeWhgDSIY. Or this one (if the first one is too intimidating) https://youtu.be/7NVa0yTPgt8. Or this one http://www.artgraphica.net/free-art-lessons/drawing-and-sketching/simple-sketches-tutorial.html
    My first reaction after watching Free Solo in Hollywood, CA, September, 2018. I got to see Honnold after the screening as he took questions (and swore and apologized several times. Clearly, he is not used to interacting with LA movie public)

    I go monochrome whenever I experiment with new things, as I try to minimize the variables. Don't know how to mix a skin tone? don't fuss, just use Neutral Tint! This is direct watercolor features a negative painting style with minimal brushwork, and took less than 2-3 minutes to complete. I may or may not have blown over the darks in the middle to make them dry faster. Shh! March, 2020.  
  5.  Color mixing. There are countless videos on the subject. For our approach, this is the most overrated thing in watercolors. Keep it simple. Take burnt sienna, add a bit of ultramarine, you'll get grey. Take phthalo blue, add a bit of lemon yellow, you'll get cool green. Ultramarine + warm yellow will give you warm green. So on and so forth. However, just to provide a glimpse of how many shades you can get with just three colors, here's a nice video demonstration: https://youtu.be/67d7qclCRS0
  6. Charging in. A technique I use a lot in the first ('chai') wash. Simply stated, it is just dropping in color from a loaded brush onto a wet paper- either pre-wetted with just water, or that already has a wet wash on it. Artist Andrew Geeson uses this technique a LOT to get his lovely loose watercolors. See how he pre-wets the paper and then drops in the color:  https://www.youtube.com/watch?v=ZoDo0tdR2Ks. Check his other excellent video demonstrations as well. 
  7. Edge softening. A technique I use a lot during my second wash, or whenever I need more control. A clear demonstration of softening an edge: https://youtu.be/Iu1V9q0Pzyw 
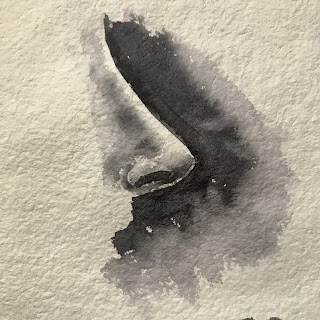
    The soft shadows of the nose are all done by softening edges. This simple technique provides a lot of control and can be used for detailed work (for which I usually don't have enough patience nor time :P). 
  8. Identifying big shapes. A nice demo on how to identify big shapes, and not to overthink colors https://youtu.be/ldZBqywAt84
  9. Finally, a few demonstrations by Marc Taro Holmes: 
    1. Direct watercolors: https://youtu.be/05cqwuyLyr8. The lion statue is closer to how I approach my sketches. Free instructional is available here. Marc has an entire book written on Direct Watercolors, but I think if you get Urban Sketchers, you've got the techniques covered. 
    2. Edge pulling: https://www.youtube.com/watch?v=JkXM2sGyon0
    3. growing a wash: Watch how Holmes treating the entire face as a single object, and making the tea wash: https://www.youtube.com/watch?v=5IF7uQQrptk . Note how he starts the second wash ('milk') at 2:59 and third layer 7:19
    4. A 'cheat sheet' of his workflow. Covers identifying big shapes, charging in, and edge pulling. 

Good luck! Show me your sketches. I am from Pune, so critiquing is in my blood!
- Hrishi


Monday, May 6, 2019

Rescue incident on Mt Whitney Trail


The third and final UPDATE: A week after writing it, I can confirm that this writeup has dissuaded several novice hikers with no mountaineering experience in doing Whitney until the switchbacks open up. In that, I believe the account has served its purpose (and hope it continues to). However, recently a news piece came out on the incident and it, among other things, revealed the identities of the hikers. With that development, I have received requests to change this and that details (some ridiculously minor), or to choose different words which would subtly change the narrative to make some of the people involved appear in different light. The reasons (which were so obvious to me I didn't think of mentioning them) I preserved the hikers identities were 1. Not cause them more embarrassment/ humiliation than they already went through 2. Not have their background (for example, their affiliation with an exceptionally famous university) generate unnecessary and irrelevant biases among the readers. 3. Most importantly, even though the incident is about these particular hikers, it is not really about them! It is about the hiker personalities they represent. I wanted to emphasize this point so that the account has a time-invariant relevance to it.

With that in view, and the fact that I am not used to getting so much social media attention and it has been distracting me from things I hold dear, I am putting an end to making updates to the writeup. I obviously do not intend to cherry-pick personal accounts, and if you were involved in the incident and wish to be heard, please feel free to add a comment.
______________________________
UPDATE #2: I have added more account of H3 with regards to the rock H1 was carrying, and more details on how H2 and H3 spent the night. H3 asked me to feel free to add these to original account, but for now due to lack of time, I am adding them as statements towards the end.
______________________________
UPDATE: I have added an account from Bruce- one of the backpackers who helped with the rescue- towards the bottom. It provides insight on the happenings while descending down the chute (of which I was not a part of). I decided to include his entire account, including the judgemental parts.
-------------------------------------------------


We all make mistakes. However, some can be more consequential than others, and to one’s own self as well as to others. And we can learn a lot from the mistakes of others, so that we can avoid doing them ourselves. With that objective in mind, this report concerns three day hikers (H1, H2, and H3) who got stranded up at Mt Muir (H1) and on Trail Crest (H2 and H3) and ended up overnighting with minimal resources on May 3-4, 2019. Along with some backpackers (about 6 from a ‘group of 12’ from Gonzaga University stayed to help at various stages), I helped support H2 and H3 until extraction, and -along with H3- communicate with H1. I have tried my best to be unbiased, restricting the report to objective, factual information which I gathered from H3 (who was the least affected), two national park rangers who landed from a recce helicopter, 4-5 backpackers from the ‘group’, and my own observation. As of this writing (5/6/2019), I have confirmation that all three are doing well. This account has been verified by H3 (through email). 

The hiker H1 was the more experienced, and had previously summited Mt. Whitney and was very familiar with the trail.  H2 and H3 were novices - neither of them had used an ice axe before; H2 did not have crampons- just microspikes on hiking boots; H3 was in jeans with a thermal layer underneath. They started off from Whitney Portal trailhead around 7:30 am. Their plan was to summit Mt. Whitney until around 2:00 pm. Considering their pace, H1 adjusted the plan to turn back at 5 pm even if they didn’t summit. H2 and H3 had no idea how difficult the hike would be and trusted H1, who had done Mt. Whitney and the chute (99 switchbacks are inaccessible due to snow) before. Hiking in the darkness was expected. Only when H3 talked to another hiker going down the chute and found out that 1) icy conditions were approaching and 2) the summit was 3 hours away from the trail crest did it become apparent that the plan was completely unrealistic. To lighten their load, H2 and H3 kept their backpacks at the bottom of the chute. The backpacks had food, water, layers, and headlamp. H2 also had a thermal blanket in the pack. H3 also had a radio in the pack and was a licensed radio operator. These packs were left behind with the idea that they would be turning around within an hour (5 pm). H2 and H3 carried only ice axes and a bottle of water up the chute. H1 carried his pack and had food, water and layers. Upon reaching the trail crest, H1 advocated for climbing Mt. Muir and took off, leaving H2 and H3 to bargain with him to turn back at 7 pm. 

After H1 departed from the Mt. Whitney trail, H2 and H3 discussed what should be done. H1 called for both of them to follow, but H2 decided immediately not to continue (H2 kept voice contact with both H2 and H3 as they disappeared out of sight and continued calling for a few minutes after that). H1 said that he needed H3 to join. At this point, H3 asked H2 what he should do and H2 suggested following H1 and making him turn around at the agreed upon time of 7 PM. With this, H3 tried to catch up to H1 who had almost passed out of view by the time H3 started. H3 followed H1 up the scramble, but upon seeing the difficulty of the route that H1 was leading, decided not to continue, announcing that this exceeded his climbing ability. At 7 pm, attempts to get H1 to turn around were fruitless. H1 then passed out of view behind a cliff. After a couple minutes of waiting in place, H3 realized that to his left there was a simple class 3 climb and found the summit to be very nearby. On the summit, H3 heard H1 asking where he was and responded saying that he was at the summit, but the route taken was much less challenging. Upon hearing H1 straining, H3 warned of taking risks (actual words: "It's just a fuckin' rock, man, don't worry about it”. H1 had a tradition of carrying rocks to the summit as a memento and signing them upon return. On this occasion, H1 was carrying a 10-lb granite slab). H1 screamed in pain and communicated his situation to H3- He had dislocated his shoulder and requested H3's assistance to relocate it, but H3 said that he did not have the climbing skills to reach H1 and that he neither had medical skills to treat the injury. H1 called via an Inreach with an SOS signal and to friends in the area, around 7:45 pm. H3 left view of H1 with H1 hearing no response from SOS signals (his friends received the message around 11 pm and contacted a rescue team. H1 was in contact with the friends throughout the night and was aware of a helicopter extraction planned for the morning). H1 instructed H3 to take care of H2 and suggested descending the chute to reach the trail camp. 
photo credit: H3
Waldo = H1. photo credit: unknown (recce helicopter?). source: H3

H3 returned to the Mt. Whitney trail to find that H2 was not present. H2 had panicked after not seeing H1 and H3 and decided to return to the trail camp, despite having no experience in descending a snow chute. H3 spent 10 minutes calling and searching for H2 before estimating that H2 may have returned to the trail crest. H2 and H3 continued calling for each other for the next half hour and when H3 returned to trail crest, encountered H2 and explained the situation. H2 was in shock and felt nausea and a need to vomit. After some time of calming, H3 and H2 decided to attempt to descend the chute.They had no glissading experience and had only seen videos of it on youtube. It was also past sunset, and the chute had turned icy. H2 remained uphill of H3, with both using ice axes to arrest. However, after about 10 feet, H2 lost control and slid into H3, leaving H3 hanging on to the ice axe (NOTE: H2's recollection differs on this particular moment- he maintains that he barely descended and at no point made physical contact with H3 that could cause him to lose stability). H3 was able to stabilize with crampons and they immediately returned to the top of the trail crest. As they were in immediate need of shelter, they started calling out for help in the direction of Trail Camp. (It was dark and my wife and I were half asleep in our tent at Trail Camp- but we did hear a few calls echoing. I dismissed it as some hikers communicating with each other. Though my wife wondered if someone was calling for help). With no response from the Trail Camp, H2 and H3 decided they had no option but to spend the night on Trail Crest. They tried to find a spot in a notch by the trail so that they could see hikers the next day. Their socks and boots started icing. They removed them and wrapped their feet with a cap. H2, growing up in the tropics had little tolerance to cold, and was worse off. H3 had spent the last few years in a colder climate and was less affected. Thankfully, there was little to no wind that night. They couldn’t sleep and tried shifting positions against the abrasive granite. At one point they tried sleeping right on the trail hoping that it’d be softer than the rocks. But H2 judged that there was more exposure to the wind from lying on the trail, so they reverted back to their spot. H2’s condition worsened progressively and nearing sunrise, he started showing symptoms of hypothermia- uncontrolled shivering and onset of incoherency. H3 embraced him to provide some warmth. H3 found us (some backpackers with the ‘group’, me and my wife) shortly after sunrise (6:30am). Henceforth, my perspective. 

I went with H3 to get H2 (who was ~ 200 yards away but was very weak) while one of the ‘group of 12’ backpackers tried calling 911. He was awake but shivering uncontrollably. But he was conscious and panicked. He was barefoot and I helped him walk to the Crest where it was now sunny. Other backpackers immediately started warming him up with layers and warming his feet by holding them in their armpits. I gave my gloves and outer layer to H3 who was shivering but was showing remarkable presence of mind and awareness, likely due to adrenalin. He took me and two other backpackers to see the status of H1. After reaching the approach diversion to Mt Muir, the other two hikers decided not to proceed up since it was Class 3. So H3 and I proceeded further. We stopped climbing after a while once we were able to make contact with H1 and found a sunny patch to stay warm. H1 was conscious, and was doing okay with food and water. After a while, Adrian, who was leading the ‘group’ came up near to us. He was in contact with his team, was the most experienced among us, and initiated several back-and-forth communications: H1 to us (H3 and me), us to Adrian, and Adrian to his teammates who were looking after and sending updates on H2. (Since there were enough people helping, half of the ‘group’ and my wife decided to push for the summit). H1 told us a helicopter was coming for him by 9:30 and given the dire condition H2 was in, efforts were made to see if he could get extracted as well. We finally heard that the helicopter would come for H1 and then ‘work’ towards extracting H2. With that somewhat ambiguous confirmation, we decided to head down from our point on the scramble; there is nothing we could do for H1 anyway. Adrian decided to look after some of his team mates while H3 and I headed back to Trail Crest to H2. Since we assumed both H1 and H2 would be extracted, I promised H3 that I would stick with him until all the way down. On the way we saw a helicopter come by Mt Muir and by Trail Crest, but thought it was impossible to rescue them so soon. The helicopter was just recceing, but dropped off two SEKI park rangers near Trail Crest.

H2 was doing very well and appeared cheerful and was holding conversations, despite occasional shivering. He was well taken care of by Trevor and Bruce from the ‘group’. However, he was not confident of going down (I believe- apologies from diverting from facts- it was a combination of him realizing the limit of his ability to descend the chute, unsurety of how he felt, the prospect of heading all the way down the mountain after the chute, as well as a bit of overreaction from the group who expressed doubt on his condition to descend, probably adding to his self-doubt) and was banking on getting extracted and somewhat assumed his insurance would cover it. The rangers dismissed any possibility of extracting H2 by a chopper (actual words: “This is not a taxi service”, though they patiently explained the bigger picture of efforts that go into extraction) since H2 was doing well, and that the spot where H1 was stranded was so tight that they would have to call for a Chinook- one would have to be flown from Seattle and was on its way, and H1 being the main priority for the extraction, which would be an ‘all day operation’. So it was decided that the only viable option for them would be to descend the entire mountain by foot. Around this time, several hikers were coming and passing us by the Trail Crest. Two day hikers (Dave and Jon) who are with the Air Force- offered to take H2 and H3 down. One of the rangers, Rob, gave H2 and H3 a quick demonstration in holding and using an ice axe on descent- while stepping and glissading. Bruce and Trevor decided to go with them and so did Rob. Laura, the other ranger, decided to go up to H1. She already knew his exact location, having seen him from the chopper. Adrian joined us as he decided to wait for the rest of his team at the Trail Crest. I had promised H3 that I will be with him, but him and H2 were in ‘more’ and ‘more  capable’ hands- the Air Force duo took responsibility of taking them all the way down. One of them had Spot which he was willing to use if needed (The ranger warned him that doing so would send an auto distress signal to his family, to which Dave just smiled and said "that's okay, they know I am here"). So H3 and I mutually decided that he would go with them while I wait for my wife ( who was with members of Adrian’s ‘group’, and did not have a prior experience of going down a chute) at the Trail Crest. I saw them start the descent down the chute, and they were very slow. They were still descending even after 2 hours (about the same amount of time it took me to climb it). My wife had been ‘adopted’ by the ‘group’ and summited and was well taken care of by them (she had no food with her. I was carrying our food and I gave most of it all to H3. I’m thankful to Adrian and Trevor for feeding me in turn). With all the ‘group’ and my wife back at Trail Crest, we started descending the chute. I met Rob who was on the way up- he expressed concern over H2 and H3 as the weather was turning bad and they had made very little progress (they were still near the bottom of the chute.) He took my Inreach email and sent me a message so that I could reply to him with ‘Okay’ or ‘Help needed’ when I came across them. I did not receive the message, but it didn’t matter- to my surprise, I did not see them when I reached the bottom of the chute, or at Trail Camp. We started wrapping up our camp. As we left the camp, I saw the Chinook arrive atop Mt Muir, send down a person. I didn’t stop for long since it was now snowing.  We headed back as fast as we could (going down steep shortcuts, we were down in less than 3 hours) and were relieved to hear that H2 and H3 and the Air Force duo had reached the trailhead before us. That rush also allowed us to get down just in time to sneak in to Mt Whitney Burger as it closed at 9. I regretted parting with Adrian without saying "Zot Zot Zot" (he studied at UC Irvine two decades before I did).

H2 and H3 descending the chute helped by Air Force duo, ranger Rob from SEKI, and Trevor and Bruce from the 'group of 12'. photo credit: me
The Chinook rescuing H1. photo credit: me
H3 confirmed later that they all were doing well. H1 was delivered to Lone Pine Airport and refused medical treatment. He then walked to a nearby clinic and was diagnosed with a sprained shoulder, with a prognosis that recovery would occur over a few days. H2 continues to have symptoms of shivering, despite not being in a cold environment. However, all are in stable conditions with minor worries.

BONUS: The sunrise was beautiful that day!

-----------------------------------
Account from Bruce from the 'group of 12'
"Great report, only Dave from the Air Force was experienced and ultimately they along with Trevor and H3 glissaded down the chute. Rob left me in charge of H2 and I tried to get him down quicker by glissading with him. He was panicky and we resorted to me kicking in steps for him to follow which took a very long time and also exhausted my supply of water which H2 was in dire need. Close to the bottom of the chute, Air Force Dave relieved me and continued to escort H2 and H3 down the mountain along with his AF colleague. That was a godsend because Trevor and I and our colleagues still needed to break camp to descend to the Portal parking area. We also descended in about 3 hours. My observation is that H2 was in advanced stages of hypothermia shakes, chills, disorientation, lack of judgement, eyes rolling back in his sockets, etc. Had we not ascended as early as we did, it is quite possible H2 could have lost his life. The good weather clearly was the other contributing factor to the survival of all three.
My takeaways:
1. Be prepared - this not only involves the physical preparedness of equipment, clothing, and Skills, but;
2. The willingness to exercise common sense and god judgement, especially if you are the steward of others less experienced (for example, when the two Air Force hikers learned that part of the trail to the summit was still quite “sketchy” the more experienced of the two immediately said to his companion, “we’re not going to the summit” even though they were well equipped and obviously fit.). This seemed like an almost perfect juxtaposition of two types of leaders, one who was mostly concerned with the welfare of who he was leading and the other more concerned with achieving his own personal goal. Hubris has been the downfall of many leaders but is especially egregious when it effects the safety or lives of others. Knowing that the mission or vision is “not to summit, but rather to return safely to the bottom of the mountain” is to fully align the highest value, human life, with any adventure."

"I should also say that the assistance of almost every member of our team from Gonzaga University, alumni and faculty, contributed in meaningful and life saving ways, including but not limited to: first aid, equipment, clothing, food, water, emergency communication, inter-personal communication, comfort, encouragement and the physical assistance on Trail Crest and on descent.  My Gonzaga cohorts were tremendously generous, compassionate, and expert in dealing with this situation, led by Department Head Dr. Adrian Popa.  And of course, many thanks to Hrishi and our colleagues from the Air Force (Dave based at Los Ángeles Air Force base and John from Edwards Air Force Base who helped with  this successful “rescue.”  It was also clear from the Wilderness Rescue Ranger, Rob, that he was grateful for our comprehensive assistance which allowed he and his wife Laura, also a ranger, to assist H1 who was in dire need of extraction.”
"
-----------------------------------------
H3's additional comments:
20-lb granite rock (NOTE: later found to be about 10-lb)
H1 carried a 20-lb slab of granite throughout the hike, fixed in his jacket. While stopping at Mirror Lake along the hiking trail, the group ran into multiple groups of hikers, including one which had turned back, and a contingent of the 'group of 12'. It was much to the amusement of the group that H1 was carrying a 20-lb slab of granite.

On the way up Mt. Muir, H3 observed that the rock was in his pack as he helped H1 zip it up after taking off his crampons.


More details on how H2 and H3 spent the night:
After their failed attempt to descend the chute, H2 and H3 made several calls for help, yelling "SOS" and "help" at the top of their lungs towards the trail camp. At the time, it seemed imperative that H1 receive help before the onset of the night, due to his exposed position on top of the mountain. After this failed, H2 and H3 resigned to staying the night at the trail crest and hoping to signal to the trail camp at dawn. H2 expressed his concern with dangers he had researched - avalanches, lightning, mountain lions, lizards, and bears. A snow foxhole was briefly considered, but due to the calm winds, abandoned in favor of a small rocky alcove, settling in around 8:30 PM.

Throughout the night, H2 expressed concern over their survival. Most of the night was spent shifting positions, searching for rocks to sit on, and adjusting clothing.H3 had a liter of water and H2 and H3 shared this overnight. Initially, the greatest danger was frostbite at their feet. Both H2 and H3 had to remove boots and socks, which were wet from snow and sweat and started to ice over. H3 took H2's feet against his abdomen to warm them up. H3 tied off his sweater around H2's feet, to which H2 added his cap, and H3 used his own cap and gloves for his own feet. Time passed slowly, and at 12:30 AM, the temperature of the night was sufficient to keep H2 and H3 shivering constantly. H2 made H3 promise to him repeatedly to stay with him unconditionally.

The most dire part of the night came at 4 AM. In about an hour, daylight would come and serve as a psychological sign that the worst had passed. H3 noticed that H2's head had started to bob backwards and embraced him and cradled his head. H2's lips were quivering and he would not respond to H3's words. His eyes were in a squint, with only the whites of his eyes showing. H3 proceeded to furiously warm H2 up and he managed to recover after about a half hour. After this point, H2 and H3 changed to constantly embracing. Around 5 AM, the sun started to rise, the temperature very gradually got warmer, and H2's demeanor improved and changed to anticipation of how to exit the mountain. Although doubting his survival throughout the night, H2 at 6 AM was now in much better condition, stating that he could make it throughout the day, but if he was forced to spend another night on the mountain, he would not survive. But H3 assured him that the Mt. Whitney trail was one of the most popular in California.

At about 6 AM, H2 and H3 decided to check the trail crest, anticipating that the hikers camping at trail camp may start their ascent at sunrise. However, both H2 and H3's socks were frozen along with their boots. They proceeded to warm up the socks by sitting on them and pressing them against the skin of the abdomen and at around 6:30 AM, H3 had managed to get both of his boots on. As soon as he stepped out, he noticed the shadow of hikers at the trail crest.

With the generous and expert care of the group of hikers at the crest, H2 recovered quickly. Although he was assessed by the hikers initially as requiring helicopter evacuation, by the time that the rangers arrived, they assessed that he was capable of descending with the assistance of volunteer hikers and without the use of a helicopter.
--------------------------------


Saturday, September 15, 2018

Winter hiking: Flotation on snow


Before we go any further, I would like to differentiate hiking or trekking from mountaineering or snow climbing by a single criterion: slope angle. If slopes are gentler than 25-30 degrees, then its hiking and you can use your boots or microspikes with hiking or skiing poles. For terrain slopes nearing 30 degrees or more (which is also the typical slope of staircases), its mountaineering and you would require the use of full crampons and an ice axe. A key note to understand here, is that snow hikes/ climbs can be fairly steep. During summer (or any non-snow season) hiking trails typically apply methods such as switch-backs that keep the terrain angle low. For example, a hike in which you gain 1000 ft elevation per mile is considered as pretty strenuous hike in summer. However, that is just 10.9 degrees! In winter, everything is covered in snow, and there are multiple ways of going from point A to B. Thus, it is very possible to hike up really steep slopes. Most folks are unable to accurately gauge terrain slopes by eye-balling. There are objective ways of measuring slopes such using a clinometer, or keeping a contour map. Getting on (and directly below) slopes above 25 degrees can create avalanche possibility that could be fatal for you, your groups, or others, and that is not the focus of this writeup. Hence, I am limiting the scope of this article to slopes below 25 degrees or in other words, 'hikable terrain'.

In the American southwest, when you extend your summer hiking into winter, you reach an obstacle: snow. If the snow is fresh but has been compacted by people walking over it before you did, you can just hike on it as if it weren't there. If the snow is icy (this generally happens when it is above freezing during day and below freezing during night), you can wear microspikes and it feels very similar to normal hiking, just a tiny bit slower. However, if you step outside the packed trail, into the soft, uncompacted snow, your foot would sink through the snow (sometimes waist-deep!) since the snow density is too low. This is called post-holing. It gets very tiring to come out of this snow only to sink again when taking the next step. If nobody else has been there before you, the snow is considered 'unbroken' and you have to 'break a trail' out of it. If you are trail breaking with just hiking boots, you will likely posthole every step, and even a mile would seem like ten. Its brutally inefficient.

So, if you are serious about winter hiking, you will need a way to extend your step's surface area so that your weight gets distributed over a larger area and you will be able to walk on soft uncompacted snow without sinking in it. Then you have just two options: snowshoes or skis. Snowshoes are incredibly easy to learn: "What are the 10 steps to learn snowshoeing? -> You attach them, and then walk 9 steps". Snowshoes have crampons attached to them. This way you can climb up steep terrain of about 20-30 degrees (depending on the snow quality and the snowshoe type) on them. However, snowshoes do sink a bit while breaking the trail, and you have to lift them completely off the snow (obviously) before taking the next step. This needs lot of energy (though certainly less than post-holing). Also, you have to do this when coming downhill as well (obviously), though depending on the terrain, runout (the area where you would slide to if you slip), and snow conditions, you may consider removing them, sitting and sliding down the slope. This is called glissading. There are many types of snowshoes available, but the only ones that can do steeps (upper range of the hiking domain: 20-25 degree slopes) are MSR Lightening Ascents. They have spikes/ teeth not just in the front but also laterally and at the back of the snowshoes. They also have heel lift which helps your calf muscles. There are more variants in this category and MSR has traded off some functions for price. I have a pair of entry level snowshoes of a lesser-known brand that I got for 50 bucks several years ago: they were great for all the hikes I have done in them except two, and both hikes were Colorado 14ers (a fancy way of calling peaks above 14,000 ft in USA). Even there, I could go very close to summit on them, but the final stretch was too steep for them on both hikes (I wasn’t disappointed for not summiting- both were great hikes). I am now on a lookout for a discounted pair of MSR LAs.

Snowshoeing in Rocky Mountain National Park right after a winter storm

Skis are heavier than snowshoes. But they are much better at breaking trail, as they need not have to be lifted off the ground with each step- they can be just slid forward. This saves lot of energy. Plus, they naturally glide when coming down. So in general, they are much faster and more energy efficient than snowshoes. Unlike snowshoes, they do not have built-in crampons. So there are four ways to climb with them:
1) wax their bottoms (aka 'base') with such waxes that would enable going forward, but resist them from going backward. There are a number of waxes that can be applied depending on the temperature and snow conditions. But if conditions are variable, and you apply the 'wrong' wax for the condition, the snow could stick on the bases and ruin the experience. Waxes are considered very fast for moving forward.
2) attach 'skins' or a piece of cloth/ material to the ski bases with an amazing glue. The skins behave similar to wax: enable forward movement, resist sliding back. They are best for climbing really steep slopes (hiking domain) but offer less glide (if you want to slide forward on them)- they are typically used only for going up, and are removed when coming down (unless the conditions are dicey).
3) getting skis with a built-in fish-scales like pattern on the base: this will do the same thing: resist sliding back while not resisting (to an extent) going forward. Having these are great for beginners: their drawback: less speed while coming down, is not really a drawback for beginners who would rather prefer a slower, controlled speed over uncontrolled acceleration.
4) Ski crampons (aka Herschians). These are uncommon, and go against the whole ski philosophy as with them on, the skis have to be lifted with each step. But they are useful for extreme slopes (mountaineering level).
5) Climbing techniques: herring-bow and side-stepping, while inefficient by their own, greatly increase the 'workable range' of any of the above 4 approaches.

Nordic backcountry skiing the Shadow Mountain with the backdrop of the Tetons.


Demerits about skis when compared to snowshoes are that they are heavier, generally more expensive. They also require a steeper learning curve: especially so for someone new to skiing (like yours truly) but also for those resort skiers new to skiing in the backcountry (they are used to just coming down steep but safe slopes using a really heavy-duty equipment without having to worry about navigation). In the next article I will describe more about skiing options in the backcountry. 


Saturday, September 23, 2017

Vectorized functions for Cross-Correlation, Covariance, and Regression for multi-dimensional data in Python

Python and its various libraries have some cool built-in functions. However, as an earth system scientist, I feel it sorely lacks a function to compare N-dimension datasets. Much of earth science data is of (time, lat, lon) nature, and as far as I am aware, there is no library that lets you compute basic statistics such as covariance, correlation, and regression between two multi-dimentional datasets along a given axis.
I first used to apply brute force and do these computations using available functions (e.g. scipy.stats.linregress()) after looping over lat and lon dimensions. i.e. double looping. As the data resolutions increased, I tried to parallelize the looping. However, I soon realized that vectorizing these statistics would not be that difficult, and depending on data size, more than 1000s times faster! Hence I wrote a function that would compute same statistics as stats.linregress(), but with multi-dimensional data in mind. Also, as several geophysics variables show lagged relationships, I have incorporated that functionality as well. Also, the two datasets, or one of them could also be a 1D time series. This way, the function is more robust, and useful to compare a single time series such as an ENSO index to a spatial dataset.
Let me walk you through the function. Like my previous Python tutorials, I have used GPCP data. You can download it from here: https://www.esrl.noaa.gov/psd/data/gridded/data.gpcp.html. Also, since annual cycle and trend affect correlation, I usually remove them, as demonstrated. Depending on what you want, you may or may not want to do this. It's certainly not required for the function to run! Also, I am not a computing whiz, so please let me know if there are more efficient ways to represent this.
In [1]:
%matplotlib inline
import xarray as xr 
import numpy as np 
import matplotlib.pyplot as plt
from  scipy import stats, signal #Required for detrending data and computing regression
In [2]:
"""Load data"""
ds   = xr.open_dataset('../../../InputData/Precipitation/GPCP/GPCP2.3/precip.mon.mean.nc')
data = ds.precip
#Plot global mean time series
plt.figure(figsize=(15, 5))
plt.plot(data.time, data.mean(axis=(1,2)), label = 'original')
plt.ylabel(data.units)
print data.dims, data.shape

"""Remove seasonality as it would influence the correlation:
Take a 12-month moving average; 
The average will affect all values in the first and last 6 months, so remove them.
"""
data = data.rolling(time= 12, center=True).mean()[6:-6,...] 
print data.shape

plt.plot(data.time, data.mean(axis=(1,2)), label = '12-mo ma')
mean = data.mean(axis=0)

"""Detrend data as it would influence the correlation"""
data = xr.DataArray(signal.detrend(data, axis=0), dims=data.dims, coords=data.coords) + mean
plt.plot(data.time, data.mean(axis=(1,2)), label = '12-mo ma & detrended')
plt.legend(loc = 'upper left', ncol = 3).draw_frame(False)
plt.title('Mean Global Precipitation')
(u'time', u'lat', u'lon') (459, 72, 144)
(447, 72, 144)
Out[2]:
<matplotlib.text.Text at 0x7ff9db800b10>
In [3]:
"""For Testing, get time series from two random grid points"""
ts1 = data[:,36,116]
ts2 = data[:,39,52]
ts1.plot()
ts2.plot()
Out[3]:
[<matplotlib.lines.Line2D at 0x7ff9db668ad0>]
As you can see, the time series have some correlation, but not much.
Here's the function, commented for clarity:
In [4]:
def lag_linregress_3D(x, y, lagx=0, lagy=0):
    """
    Input: Two xr.Datarrays of any dimensions with the first dim being time. 
    Thus the input data could be a 1D time series, or for example, have three dimensions (time,lat,lon). 
    Datasets can be provied in any order, but note that the regression slope and intercept will be calculated
    for y with respect to x.
    Output: Covariance, correlation, regression slope and intercept, p-value, and standard error on regression
    between the two datasets along their aligned time dimension.  
    Lag values can be assigned to either of the data, with lagx shifting x, and lagy shifting y, with the specified lag amount. 
    """ 
    #1. Ensure that the data are properly alinged to each other. 
    x,y = xr.align(x,y)
    
    #2. Add lag information if any, and shift the data accordingly
    if lagx!=0:
        #If x lags y by 1, x must be shifted 1 step backwards. 
        #But as the 'zero-th' value is nonexistant, xr assigns it as invalid (nan). Hence it needs to be dropped
        x   = x.shift(time = -lagx).dropna(dim='time')
        #Next important step is to re-align the two datasets so that y adjusts to the changed coordinates of x
        x,y = xr.align(x,y)

    if lagy!=0:
        y   = y.shift(time = -lagy).dropna(dim='time')
        x,y = xr.align(x,y)
 
    #3. Compute data length, mean and standard deviation along time axis for further use: 
    n     = x.shape[0]
    xmean = x.mean(axis=0)
    ymean = y.mean(axis=0)
    xstd  = x.std(axis=0)
    ystd  = y.std(axis=0)
    
    #4. Compute covariance along time axis
    cov   =  np.sum((x - xmean)*(y - ymean), axis=0)/(n)
    
    #5. Compute correlation along time axis
    cor   = cov/(xstd*ystd)
    
    #6. Compute regression slope and intercept:
    slope     = cov/(xstd**2)
    intercept = ymean - xmean*slope  
    
    #7. Compute P-value and standard error
    #Compute t-statistics
    tstats = cor*np.sqrt(n-2)/np.sqrt(1-cor**2)
    stderr = slope/tstats
    
    from scipy.stats import t
    pval   = t.sf(tstats, n-2)*2
    pval   = xr.DataArray(pval, dims=cor.dims, coords=cor.coords)

    return cov,cor,slope,intercept,pval,stderr
Equations in the function are as follows. Note that the mean and standard deviations mentioned here should be calculated along time axis only.
P-value is computed from t-statistic. In python, this can be done by scipy.stats.t.sf(tstats,n-2)
(For a two-tailed test, multiply this value by 2)
Now lets call the function. To test it, lets regress ts1 with our 3D data. Thus, from the result, [39,52] will be same as comparing the two time series ts1 and ts2. This way we can compare the above function directly with stats.linregress(). Finally, lets also compare ts1 and ts2 as well with our new function, to demonstrate data could be just 1-dim time series as well (but of course one could just use linregress() for that).
In [5]:
cov,cor,slope,intercept,pval,stderr = lag_linregress_3D(x=ts1,y=data)

print 'x = 1-dim, y = 3-dim:\n', cor[39,52].data, pval[39,52].data, slope[39,52].data, intercept[39,52].data, stderr[39,52].data

ans = stats.linregress(ts1,ts2)
print 'stats.linregress() output:\n',ans.rvalue, ans.pvalue, ans.slope, ans.intercept, ans.stderr

cov,cor,slope,intercept,pval,stderr =  lag_linregress_3D(ts1,ts2)
print 'x = 1-dim, y = 1-dim:\n',cor.data,pval.data,slope.data,intercept.data,stderr.data
x = 1-dim,y = 3-dim:
0.380596528376 7.42137644014e-17 0.827110406454 -1.04761936677 0.0952662045493
stats.linregress() output:
0.380596528376 7.42137644014e-17 0.827110406454 -1.04761936677 0.0952662045493
x = 1-dim, y = 1-dim:
0.380596528376 7.42137644014e-17 0.827110406454 -1.04761936677 0.0952662045493
Cool.
Now let's check the lag relationship by providing lag=1 for ts1:
In [6]:
cov,cor,slope,intercept,pval,stderr = lag_linregress_3D(x=ts1,y=data, lagx=1)
print cor[39,52].data, pval[39,52].data, slope[39,52].data, intercept[39,52].data, stderr[39,52].data

"""To compare, we will have to remove the first value from ts1, and last from ts2"""
ans = stats.linregress(ts1[1:],ts2[:-1])
print ans.rvalue, ans.pvalue, ans.slope, ans.intercept, ans.stderr
0.368070672591 9.34479421295e-16 0.800285575279 -0.791402795262 0.0959424514999
Thats all folks!