
I have seen, for countless number of times, panoramic shots of beautiful mountains or sea shores. While they are good to look at, they somehow don’t impress me. I feel they are largely unbalanced. They always seem to be cropped and mind seeks for the elements which it thinks have been sacrificed for the panoramic composition. Panoramas, in my opinion, look good only if they are not excessively long and when they are printed in a large print and put on display. Otherwise, they look too tiny to look at, especially on the tiny monitor. A few months ago, when I became interested in landscape photography, I read about view cameras and subsequently got introduced to the square format. It suddenly struck a chord with me. I found it the simplest to compose and solidly balanced to view. It works well not only for landscapes but for other genres as well like bird or butterfly portraits. One important point is that it looks different from the zillions of 3:2s and 4:3s and the panoramas and makes the image stand out. It gives a whole new perspective to compose images.
Obviously, my initial thought was to crop the 3:2 photos into 1:1. But that makes me loose the resolution of an already modest camera (a 5MP Coolpix). Fortunately, I found a workaround. While exploring landscape photographers, I came across Darwin Wiggetts. Not only is he a master at capturing majestic landscapes, but he also uses tilt shift lenses for most of his work. He takes two horizontal images by shifting the lens and then stitches them together in a square format. Unfortunately, I don’t have resources for such investment. Hence, I decided to give it a shot using a friend’s Nikon Coolpix L10.
What I simply do is look for a good composition, do a little previsualization so that you know what your image would look like. I usually take 2 or at the most 3 horizontal images in vertical movement. As I don’t use tripod, I have to ensure that there is enough overlap in the images so that they’ll get easily stitched. To ensure this, I use the grid lines in the LCD. I start with the foreground first as I find it difficult to capture than the background. Then I move the camera a little upwards (assisted by the gridlines) so that 1/3rd of the image gets overlapped. The camera settings are automatic (it doesn’t have manual controls!). It is often suggested the camera should be set on manual mode and the exposure should not be changed during the panoramic shoot. For vertoramas, I find, it works better the other way round. Giving correct exposures to both the images ensure that foreground as well as the background is well exposed. By applying layer masks, both foreground was well as the background can be seen as neatly exposed in the final image. This negates the need of the graduated neutral density filters, exposure bracketing, HDR etc. The widest FOV from the L10 is that of a 35mm lens. Still, I find stitching two images is sufficient for most of the times. Additionally, it gives me that magical square format.
 The Foreground shot
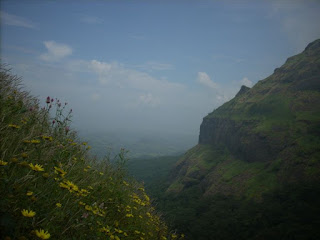
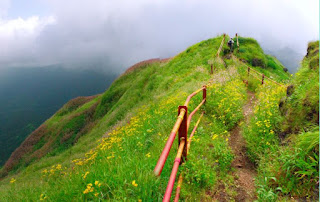
The Background shot
Once home, I open these two images in a freeware Microsoft ICE (Yes, you are reading Freeware and Microsoft in the same line!). ICE stands for Image Compose Editor. Simply opening the images in ICE is enough. They get stitched by default. ICE has three menus: Stitch, Crop and Export. Various kinds of camera motions are considered by the software when the images are opened. It chooses the one it finds the best. Sometimes, if I wish to change the perspective, I feed in Rotating Motion. This lets me change the Projection (distortion and the perspective). Once the images get stitched, I rarely have to crop the images as they were fore planned. Then I do post processing in the form of enhancing the levels, curves, colour balance, hue and saturation. If there are any blown out highlights, I increase the levels of Black of the White colour in the Selective Colouring. Sometimes, I use the gradient tool to get the graduated neutral density filter effect.
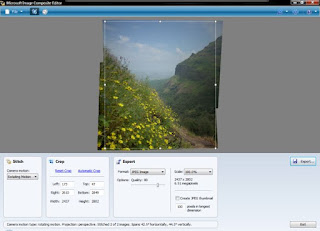
Both images opened in Microsoft ICE.

Final Image after post processing
A few more Vertoramas: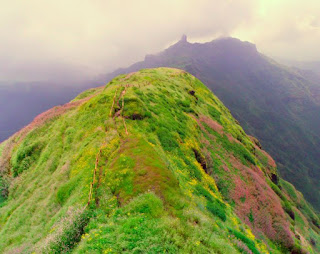
Torna
Torna again
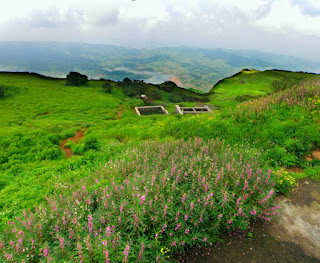
Sometimes, we can go the other way round. Take horizontal panoramas keeping the camera vertical. This again gives a massive resolution to the image and also gives it more height.
An example of a panorama taken from multiple images in horizontal orientation
To give justice to vertoramas, you need to print them really big. Atleast 18"x18" (or whatever the aspect ratio is) + border + frame and put it high on display. The reason is there is tremndous amount of data captured in the image and it will simply go unnoticed. Don't worry about printing at 300dpi. I've printed a few at 150dpi and they look pretty cool. One of the most appreciated photo at my father's office is a 8x12" frame of Naukuchiatal taken by a 2 MP cellphone. Resolution, sharpness the matter the most only on internet forums. For a landscape its the light, the colours and the composition which matters period. You might notice that my images are a little extra saturated. The reason is the prints I have made till now have lacked saturation. Hence I increase it in the image so that the prints do fine.
My landscape photography is evolving rapidly. I shall further experiment with many other techniques to get the images I want. For now atleast, Vertorama provides me a great hand to capture the Sahyadri.