
- See the trail, including its start and end points
- Your location (whether or not on the trail)
- Topographic features (hills, valleys, and gradient) around the trail
- Ability to access maps offline. This is a must because you don’t want to rely on a service provider signal, and you will be keeping the phone in airplane mode anyway (so no reception). Thus, it is a good idea to download the approximate area map before you leave your house!
- Ability to clearly see topographic maps. There can be several map layers providing different information: topography, land management, terrain slope etc. Most maps in the US will be based on USGS toposheets, and will likely have contour lines at intervals of 40ft. These, and the contour markings, should be easily legible. If the map has popular trails already marked, that’s even better! Gaia app has their own map called 'Gaia Topo (feet)' which is real easy to read, and has many trails marked and labeled.
- Ability to import custom trails. Suppose the map does not show a specific trail, you should be able to import a gpx or kml file into the app. With Gaia GPS, I can do so by emailing the file to myself, and opening it into Gaia (on iphone: click on the attachment and select 'Copy to Gaia GPS'). Once imported, the trail should be visible on top of the map!
- An arrow pointing your location, and its direction pointing the direction of the phone. This is super user-friendly. The location of the arrow is your position on the map, and the easiest way to know which direction you are facing is to look at the arrow tip while keeping the phone horizontal and directly in front of you.
- A compass showing your bearing. It is not essential, but the above points will help provide a context to these bearings and make them more intuitive, and significantly lessen the learning curve to use a real compass.
Why navigate?
->For veteran
hikers/ backpackers, the answer is obvious. For novice/ casual hikers- even if
most trails you will venture on are marked and likely well used, you will
sooner or later find that you are lost. Snow, hiking early in the season, lack
of people, lack of light (dawn/dusk hours), too many markers ("the cairns
point to which trail exactly?") are just a few reasons why you want to be
self-reliant in navigating through the trail and back safe to your car.
What is the essential navigation
gear?
-> Topographic
maps, compass and GPS. Or their digital realizations.
While navigation
with compass and map is ideal and robust, it has a relatively steep learning curve that can put off casual hikers from navigation itself. Navigating using a map and GPS
is very simple and fast.
A topographic map
tells you the terrain around you, and GPS, at a bare minimum, points your
location. Combining these two, you should be able to
Why Smartphone?
-> If you
already own them, smartphones are the most cost effective way of setting
up a map and GPS system. All current smartphones have a decently accurate GPS, and
there are apps available to facilitate navigation using smartphone alone. Recent
iOS upgrades now enable use of GPS while the phone is in airplane mode, thus providing a tremendous battery life advantage. From what I have heard, Android phones have
been doing this even longer. Thus, with a smartphone and a navigation app, you
have an excellent GPS and map system that can last for several days! And with
a lightweight portable battery charger, you can extend the smartphone usage to
more than a week!
Which Apps?
-> There are
several. Gaia, All Trails etc.
I am not an expert
on all of these, but have been using Gaia for several years (even before they
hiked the price and added subscription. Even now, at $20 one-time cost, it
provides you a complete system to navigate safely). Here is a list of features
you would ideally want on your app: I will demonstrate on Gaia, but make sure
that your favorite app has these features.
Note that there are
several apps that can 'record or log' your hike, such as Mapmyhike, Runkeeper
etc. But recording a hike takes up a lot of battery. Often time they won't
have all of the above features.
Where to find trail routes files to import as mentioned in #3?
-> My favorite resource is hikingproject.com. It is a community maintained resource, and lets you download individual trails as .gpx files. It is also a very good tool to choose which trail to hike, and plan your hike: it has information on the trail distance, elevation gain, and the terrain slope (how steep or easy the trail is going to be). Plus it rates its database into easy to difficult hikes (though don't rely too much on it, as it is user based. A difficult trail for you might be an easy one for someone else).
In fact, hikingproject.com is an excellent navigation app. From our list, it has features #1, #3, and #4. All its hike database can be freely downloaded, and be accessed offline. It doesn't provide contour information (#2). However, if you have a printed map (see my next blog post), then hikingproject.com is an excellent free alternative to the likes of Gaia and All Trails. Additionally, as it doesn't save maps, it takes up relatively less space on smartphone.
Practice using smartphone for navigation on low risk trails - trails that you know quite well. Acquaint yourself with relating contour information with what you see, how you feel at different steepness levels of contours. If you do, in future you would be able to guess the terrain and your hiking pace by just looking at the map!
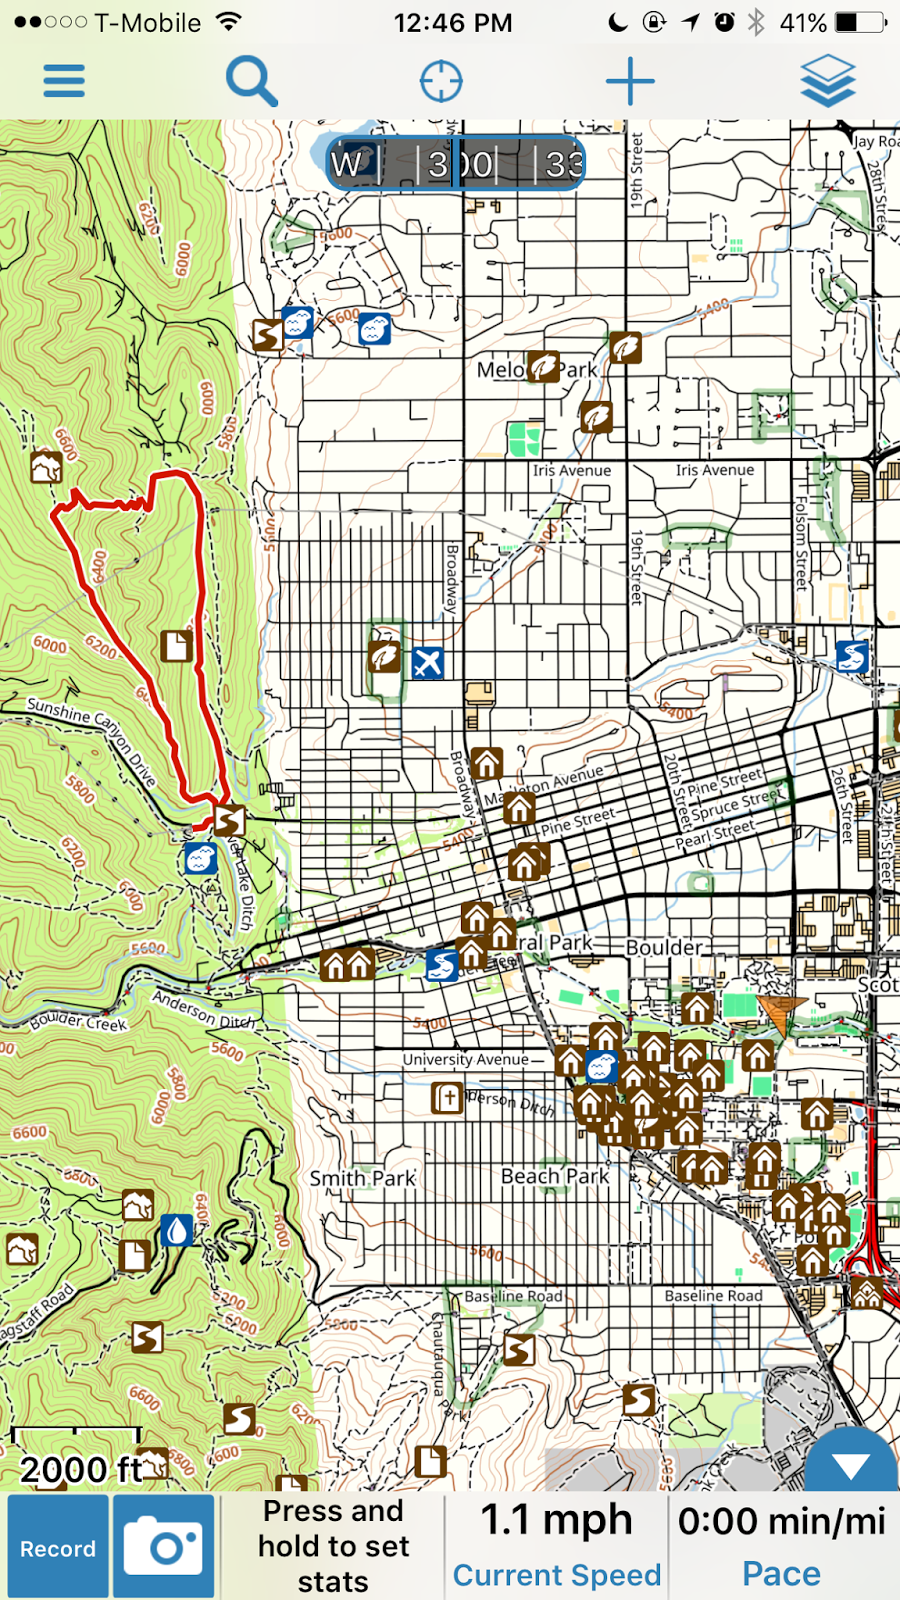 |
Here's a screenshot of Gaia GPS showing all the above
features: On upper left it shows a local hike (Mt. Sanitas in Boulder, CO) whose
trail was downloaded from hikingproject.com and imported into Gaia. Contour information is available and legible.
The brown arrow on the right shows my location, and I had it pointing to the
trailhead of Sanitas. The compass shows a bearing of 300°. In other words, the Sanitas trailhead is 300° from my current location.
|
No comments:
Post a Comment